
Once in a while, you might think about, How to turn off WooCommerce store? Well, sometimes it’s necessary to shut off your store for maintenance.
Undoubtedly, it’s a good functionality that comes in handy on many occasions, and shutting down your store is easy. You can temporarily disable your website using or without a plugin; it is up to you.
In this guide, we will discuss 3 of such techniques below.
Let’s get started!
Is It Necessary to Turn off Your WooCommerce Store?
Turning off your WooCommerce store is not always necessary, but sometimes it can be beneficial. For example, if your store requires significant updates or maintenance, temporarily deactivating it can prevent customer disruptions. Similarly, during extensive inventory management or a complete website overhaul, pausing your store allows you to focus on these tasks without ongoing sales pressure.
Also, if there are legal or compliance issues, suspending operations until these are resolved is prudent. Personal or strategic business reasons also justify temporarily shutting down your store. In summary, while not mandatory, there are specific scenarios where turning off your WooCommerce store has advantages, depending on your needs and circumstances.
The New Era Checklist for Starting an Online Business in 2024
2 Methods to Turn off a WooCommerce Store
#Method 1: Turn off WooCommerce store using functions.php file
This method will use your site’s theme to shut down your store. This process will mandatorily shut off your site and restrict users from accessing it. However, they will be redirected to the home page if they follow any link.
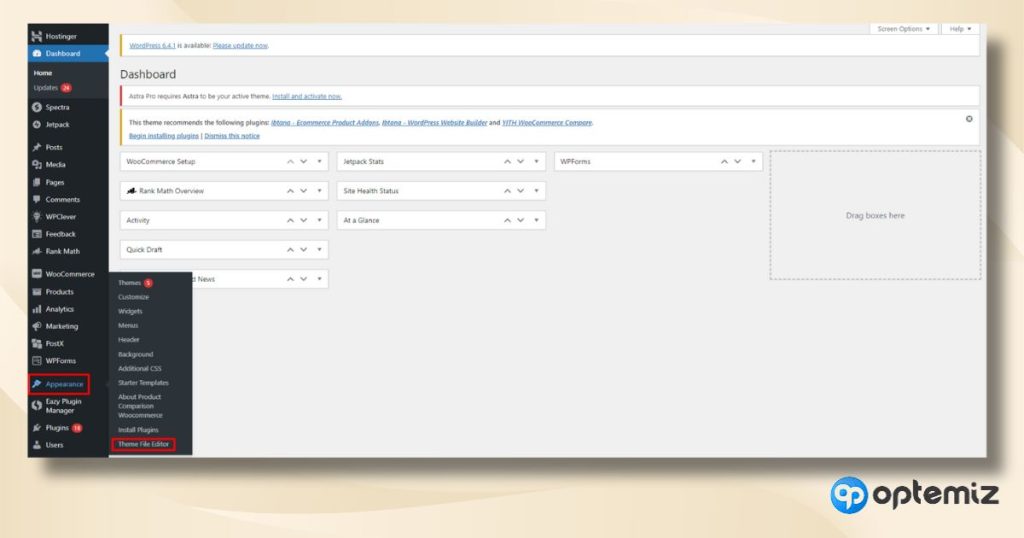
Step 1: Access your theme’s functions.php file
First, go to your WordPress dashboard and navigate to Appearance. You will see the Theme editor option.
Step 2: Insert this code
On the right-hand side, find and click on the functions.php file of your active theme. Remember the code will only work if you use it on your active theme. Scroll down and Insert this code,
function disable_woocommerce_shop(){

    if ( is_shop() || is_woocommerce() || is_product_category() || is_product() ) {

        wp_redirect(home_url());

        exit;

    }

}

add_action('template_redirect', 'disable_woocommerce_shop');
Write it in this area,
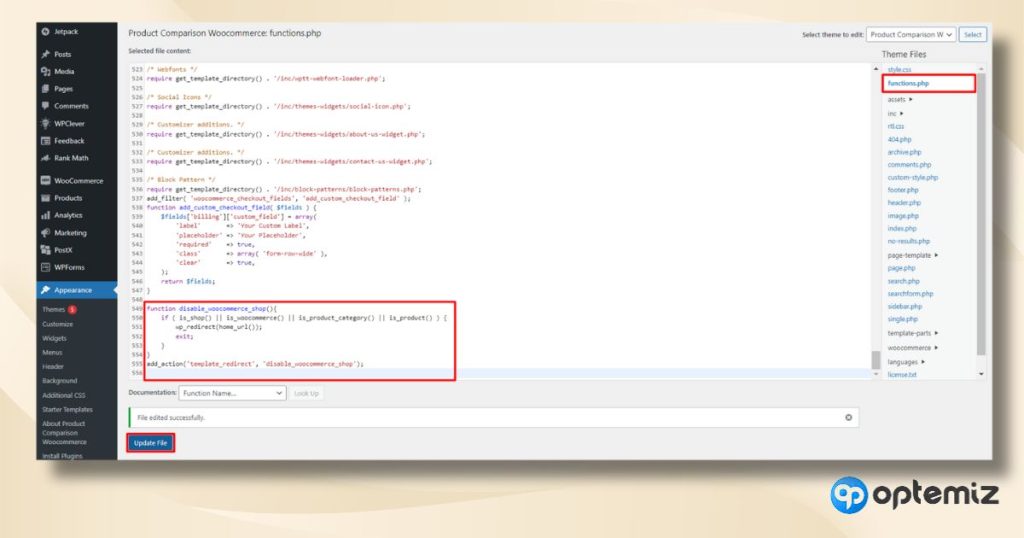
Finally, update the file and save the changes.
Always check any code-related edits in a test site before releasing it on the original site. If something terrible happens, you can always keep the real site safe.
#Method 2: Use a private store plugin
Instead of using a PHP Snippet, you can use plugins to shut down your site. You should use the Store Vacation plugin because it is simple and easy to use.
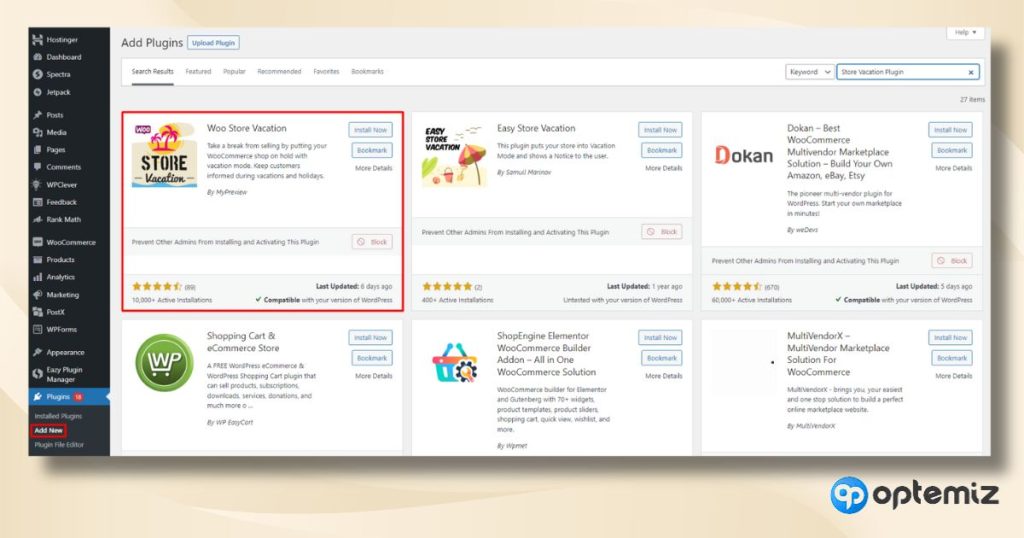
Step 1: Install and active Store Vacation plugin
First, install the plugin from the WordPress plugin directory.
8 Best Shipping Plugins for WooCommerce in 2024 (Reviewed and Tested)
Now, navigate to the settings.
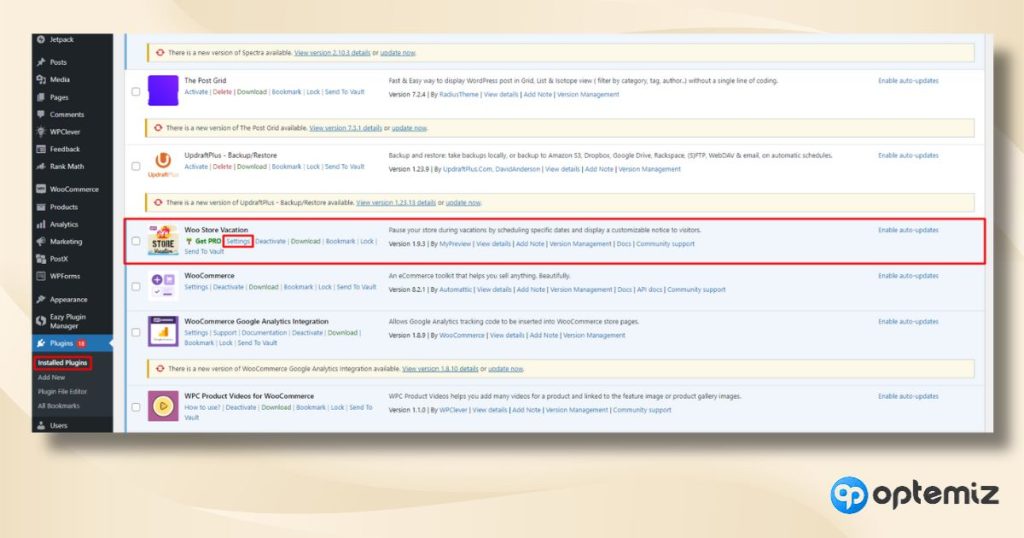
Step 2: Modify the plugin settings
In the settings menu, you will see a bunch of functions that you can use to turn off your shop.
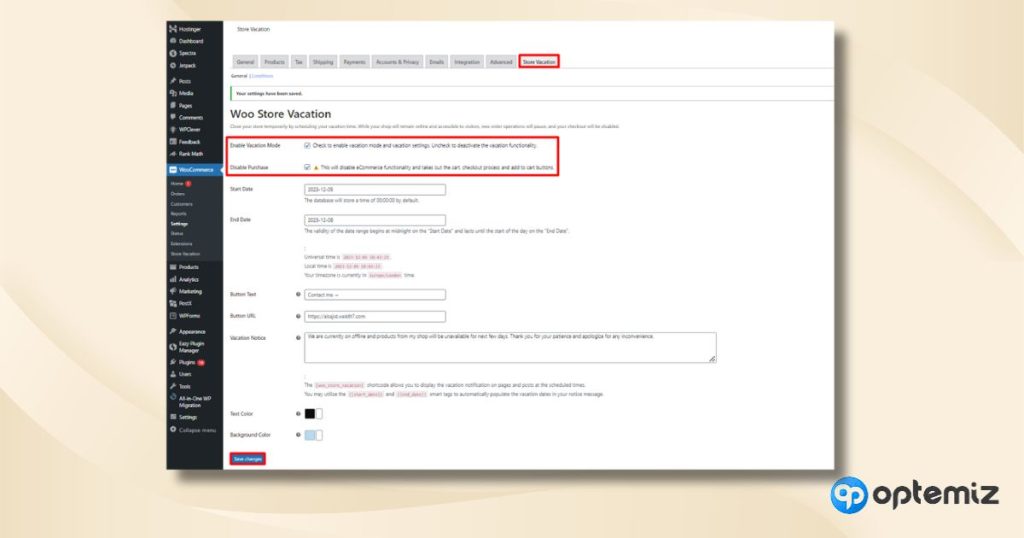
The Woo Store Vacation plugin provides a user-friendly way to temporarily disable your WooCommerce store, which is particularly useful when you’re on vacation or need to pause sales for any reason. Here’s a detailed look at each setting:
> Enable vacation mode
This option turns the vacation mode on or off. When enabled, it activates the vacation settings you’ve configured for your store.
> Disable purchase
This setting controls whether customers can purchase from your store during the vacation period. When activated, it prevents customers from adding products to their cart and checking out.
> Start date
This is the date when your vacation mode will begin. The vacation settings (like disabling purchases or showing a vacation notice) will take effect from this date.
> End date
This is the date when your vacation mode will end. After this date, your store will return to normal operations, and all vacation settings will be disabled.
> Button text
This field allows you to customize the text for a button that can be displayed to your customers during the vacation period. This could be used to direct them to more information or to a different page, such as a FAQ about your vacation period.
> Button URL
Here, you enter the URL you want the button (configured in the “Button Text” setting) to link to. This could be a page on your website or an external link.
> Vacation Notice
This customizable message will be displayed to your customers during the vacation period. It’s typically used to inform visitors about the temporary status of the store and can include information like when the store will reopen.
> Text color
This setting lets you choose the text color used in your vacation notice. It helps ensure the notice is visible and readable against your site’s design.
> Background color
This option lets you select the background color for your vacation notice. Choosing a color that contrasts nicely with the text color ensures that the notice stands out to visitors.
So, after enabling vacation mode, set a starting time and ending for the vacation period. You should see a message like this,

FAQs
Can you pause your online shop?
Yes, you can undoubtedly pause your WooCommerce store. This is especially useful when you cannot manage your store, like vacations or inventory updates. You can use a plugin designed for vacation mode or manually edit your functions.php file to redirect all shop-related pages. This way, your store appears ‘on break’ to customers while you maintain backend access for updates or changes.
How do you turn off the sale individually in a WooCommerce store?
To turn off sales for specific products in your WooCommerce store, you must access each product’s edit page. Navigate to the ‘Product data’ section, and under the ‘General’ tab, you will find the option to set a sale price. Leave this field blank or remove any existing sale price. This action removes the product from sale status without affecting its overall listing in your store.
How to turn off stock status in WooCommerce?
Disabling product stock status in WooCommerce is a useful feature for managing inventory visibility. Go to the ‘Inventory’ tab under ‘Product data’ for each product. Here, you’ll find the ‘Stock status’ option. Change it to ‘Out of stock’, and the product will no longer appear available. This is an effective way to manage temporarily unavailable products without removing them from your site.
Can you disable SKU in WooCommerce?
In WooCommerce, each product’s SKU (Stock Keeping Unit) field is not mandatory. If you prefer not to use SKUs, leave the SKU field blank in the ‘Inventory’ section of each product’s data. This will result in the SKU not being displayed on the product page or in your store, making it invisible to customers but still accessible in your backend for administrative purposes.
Can you turn off sales individually in WooCommerce?
Turning off sales for individual products in WooCommerce is a straightforward process. On each product’s edit page, under ‘Product data’, you can set or remove a sale price in the ‘General’ tab. By removing or not setting a sale price, the product remains available at its regular price without the sale promotion. This is ideal for selectively managing sales and promotions on specific items in your inventory.
Conclusion
Understanding how to turn off your WooCommerce store involves various methods suited to different needs. In this guide, we showed both the with-the-plugin and without-the-plugin methods, so you can select whichever you want.
Using a plugin is a better method because it eliminates any problems you might face while using code snippets. However, to bring back the natural state of your WooCommerce shop, you can remove the plugin by deleting it, and delete the code snippet by selecting it. You can get the same result both times!
Best of luck!